
Adding a Fediverse Share Button to my Emacs Nikola Blog

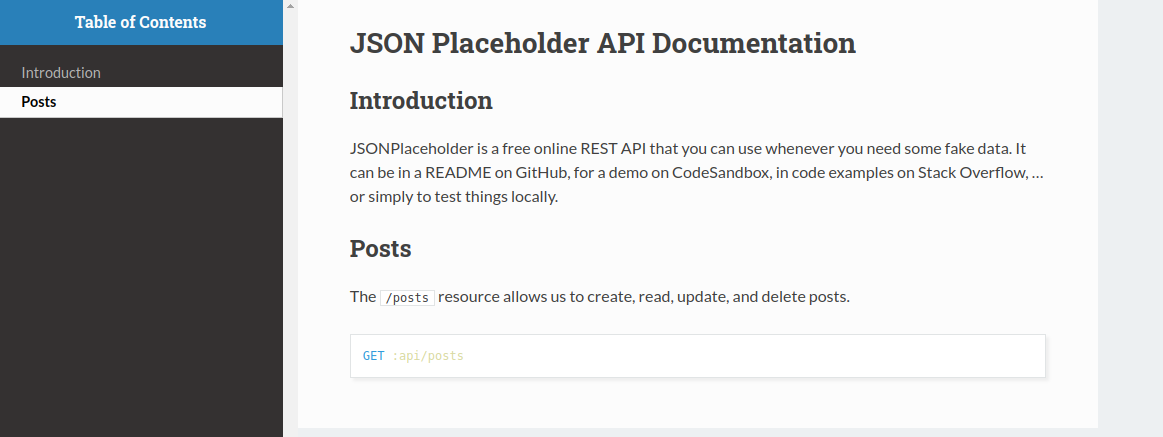
I was browsing the Fediverse, as is my wont, and I came across a fella named Stefan Bohacek announcing the release of his new Fediverse Share Button. I tried it with my Sharkey instance and it worked! So I decided to add it to this blog. Even working with Nikola and Emacs, it was pretty frickin' easy.

To continue my very meta habit of writing about blogging on my blog, here's how I added the share button at the bottom of this page.

Install Fediverse Share Button

First, we simply need to clone the fediverse-share-button repo. I cloned it next to my blog directory to make it a little simpler to move files into place, like this:

cp -r ./fediverse-share-button/fediverse-share-button ./notroot-blog/files

That's it for now! Next, I'll show you how to incorporate those files into your Nikola builds.

I referred to this "Random Geekery" blog post to figure out how to tweak Nikola themes and templates to include my fancy new share button.

Boiling down my "learnings" (barf) for the reader, here's what I did.

Create a New Theme to Tweak

Rather than tweaking the installed theme – in my case, the hack theme – we want to inherit from it, and make the changes to our own theme templates.

First, I created a new theme called notroot, based on hack, like this:

nikola theme --new notroot --parent hack

Then, I changed my theme and disabled bundling in Nikola's conf.py, like this:

THEME = "notroot"
USE_BUNDLES = False

Then, I copied the post template into my new notroot theme, like this:

nikola theme --copy-template post.tmpl

To make sure my new notroot theme was exactly the same as hack, I did a quick built and served it locally, like this:

nikola build
nikola serve

Perfect! Nothing changed… yet.

Add Fediverse Share Button

Next, I opened the aforementioned post.tmpl file in Emacs, and more or less followed Stefan's instructions. However, because we're working with a Nikola template (Mako), there was a little more to it.

My post.tmpl has a block called extra_head, so that's where I added the CSS link. It should look sorta like this afterwards:

<%block name="extra_head">
<!-- ... the rest of 'extra_head' ... -->
<link rel="stylesheet" href="/fediverse-share-button/styles.min.css">
</%block>

Note that, unlike Stefan's instructions, we use an absolute path here /, not a relative path ./, to the fediverse-share-button/ directory. That's because Nikola will move things around when it builds, and because we just plopped fediverse-share-button into the files/ directory, it will be at the top level, next to assets/ and images/.

To include the <script> tag pointing to the Javascript for our share button, I had to add an extra_js block to the bottom of post.tmpl. It also uses absolute paths, like this:

<%block name="extra_js">
<script src="/fediverse-share-button/script.min.js" defer class="fsb-script"></script>
</%block>

Then, finally, I was able to include the actual button <form> element. I chose the bottom of the post, above the navigation. The whole content block, after my changes, looks like this (comments added for emphasis):

<%block name="content">
<article class="post-${post.meta('type')} h-entry hentry postpage" itemscope="itemscope" itemtype="http://schema.org/Article">
    ${pheader.html_post_header()}
    <div class="e-content entry-content" itemprop="articleBody text">
    ${post.text()}
    </div>
    <aside class="postpromonav">

	<!-- START fediverse-share-button form -->

	<form class="fsb-prompt">
	    <label>Share with the fediverse</label>
	    <div class="fsb-input-group mb-3">
		<span class="fsb-input-group-text">https://</span>
		<input required
		       type="text"
		       name="fediverse-domain"
		       placeholder="mastodon.social"
		       class="fsb-input fsb-domain"
		       aria-label="Amount (to the nearest dollar)">
		<button class="fsb-button"
			type="submit"><img src="/fediverse-share-button/icons/mastodon.svg"
					   class="fsb-icon"></span>Share</button>
	    </div>
	    <p class="fsb-support-note fsb-d-none">
		This server does not support sharing. Please visit <a class="fsb-support-note-link"
								      target="_blank"
								      href=""></a>.
	    </p>
	</form>

	<!-- END form -->

    <nav>
    ${helper.html_tags(post)}
    ${helper.html_pager(post)}
    </nav>
    </aside>
    % if not post.meta('nocomments') and site_has_comments:
	<section id="comment-section" class="comments hidden-print">
	<h2>${messages("Comments")}</h2>
	${comments.comment_form(post.permalink(absolute=True), post.title(), post._base_path)}
	</section>
    % endif
    ${math.math_scripts_ifpost(post)}
</article>
${comments.comment_link_script()}
</%block>

Then, once again, I built it and served it locally to check my work.

Style the Fediverse Share Button

Success! Except…

Except the CSS was all screwy. The share button itself was enormous, due to how hack CSS treats all <img> tags, and it was all left-justified, when my tags right below are centered.

Let's fix that!

It turned out to be dead simple. I inspected the classes in the browser, fixed it so it looked right, then copied those styles out of files/fediverse-share-button/styles.css and into my own files/assets/css/custom.css file. Then I added the attributes needed to fix things.

To fix the enormous button, I just added !important to max-width:

.fsb-icon {
  max-width: 1rem !important;
  margin-right: 0.5rem;
  vertical-align: baseline;
}

To get the whole shebang centered, I modified .fsb-prompt to add auto margins on the right and left, which effectively centered the <form> itself. I also had the form center text. It looks like this, now:

.fsb-prompt{
  max-width: 500px;
  margin-top: 52px;
  margin-left: auto;
  margin-right: auto;
  text-align: center;
}

And voila! Beautiful!

Build and Deploy

Once I was satisfied with the look and functionality, I was ready for the final build and deployment.

First, though, I needed to minify the CSS changes that I had made. Stefan describes this, as well – for both JS and CSS – but here's exactly what I did:

npm install minify -g
minify files/fediverse-share-button/styles.css > files/fediverse-share-button/styles.min.css

Finally I was ready to build and deploy, as usual, from within Emacs.

  • M-x nikola-build to build.
  • M-! nikola deploy to deploy.

Next Steps

Next steps are three-fold:

  1. Publish this blog post to my blog.
  2. Once published, I will click the Fediverse Share Button and share to my Fediverse account.
  3. Then I will get the article ID of that Fediverse note, and add it to the meta for this post. Then I'll rebuild and redeploy. This will enable the "Comments" section, and replies to my Fediverse note will appear as comments on this blog post!

It's like frickin' magic, baby!

Blogging with Emacs: Plots and Diagrams

Continuing my very-meta habit of blogging about how I'm blogging, and not much else… I give you: "Bells and Whistles," perhaps better titled, "More of the Same".

In Emacs Org Mode, there are many ways to plot and diagram, and even draw (it's terrible, don't bother). Let's see if we can get some working with my Nikola-based blogging solution.

Plotting Charts

This example is from Org Mode's official documentation, though I've changed the output path for Nikola building.

First I'll activate a Python venv with matplotlib pre-installed

import matplotlib
import matplotlib.pyplot as plt
fig=plt.figure(figsize=(3,2))
plt.plot([1,3,2])
fig.tight_layout()

fname = '../images/myfig.png'
plt.savefig(fname)
# fname[1:] # return this to org-mode

Then make an HTML link (on Org export) into images, like this:

[[./images/myfig.png]]

Which will then display the image after Nikola builds, like this:

nil

Voila! We plotted a chart! If I change the Python code, and re-build, I'll get a different chart.

Diagramming

Diagrams are different from plots and charts. They aren't strictly mathematical. Instead, we need to look to other possible solutions.

Emacs package sources offer several options, but the one I have experience with is ditaa.

+--------+   +-------+    +-------+
|        | --+ ditaa +--> |       |
|  Text  |   +-------+    |diagram|
|Document|   |!magic!|    |       |
|     {d}|   |       |    |       |
+---+----+   +-------+    +-------+
    :                         ^
    |       Lots of work      |
    +-------------------------+

Then make an HTML link like before:

nil

Voila! We made a diagram!

Conclusion

I also tried including LaTeX equations and inline LaTeX, to no avail. Even with the default MathJax, it seems that Nikola does not do a pure Emacs Org Mode export to HTML, and I was unable to get LaTeX working.

Which brings up the point I'd like to conclude with:

Nikola + Org Mode is a workable solution that lets us use most Org Mode features out-of-the-box, like tables, executable code blocks, and the like.

However, when it comes to bells and whistles, it falls a little short of pure Org Mode HTML export.

  • Having to create a separate HTML link for an image is annoying, but Nikola makes so much else easier that I can probably overlook it. If I was doing a pure Org Mode export, Emacs would create the image link for me.
  • The ditaa integration was awkward, at best. I basically had to do an Org Mode HTML export to the ../images directory, then add an HTML link. If it was pure Org Mode export, Emacs would create the image link for me.
  • No Emacs-based LaTeX. In fact, I couldn't get LaTeX to display at all! Even after I added the mathjax tag to the post's meta file, as described in the Nikola Handbook.

For now, I'll keep using Nikola, but my next iteration of this blog might be pure Org Mode, with HTML templates.

How I Made This Site (This Time)

Someone on the Fediverse was curious how I made this site, since I mentioned using Emacs org-mode, and their own site is built using org-roam and Hugo.

It's not that much different from the more complicated process I was using before, on GitHub Pages. This one is simpler in one respect: I'm deploying directly to my own host, so I don't have to use the more complicated nikola deploy_github configuration, which requires separate source and deployment Git branches.

For reference, here's my original post on how to get Nikola and nikola.el working with GitHub Pages:

Publishing with Nikola in Emacs

This time, I'm going to take the reader through the setup, step-by-step.

Requirements

Here are the things you'll need for this tutorial. I'll show you some steps.

  • Emacs: Obviously. With Org Mode.
  • Git: Git and a private Git repository.
  • Nikola: Nikola is a static site generator, with an orgmode plugin.
  • nikola.el: nikola.el is an Emacs package that wraps Nikola functions.
  • Webserver: This setup assumes you have your own private webserver for deployment, but Nikola has a test server.

Install and Configure Nikola

From Nikola's installation instructions, slightly tweaked to use v8.2.4:

python3 -m venv nikola-env
cd nikola-env
bin/python -m pip install -U pip setuptools wheel
bin/python -m pip install 'Nikola[extras]==8.2.4'

You can now use Nikola by launching the script directly:

bin/nikola

Or you can activate the environment before working with Nikola and use the nikola command:

source bin/activate
nikola

Install Nikola add-ons

Now you need the Nikola orgmode plugin.

nikola plugin -i orgmode

And you need to install a Nikola theme. I chose the hack theme, but you can pick another.

nikola theme -i hack

Init Local Blog

Nikola sites require a particular directory and file structure, and it has a command to create that for us. Let's use that method, rather than more complicated options.

See Nikola's instructions, here. Here's what I recommend:

nikola init --demo <directory_name>
cd <directory_name>
git init

This creates the Blog structure, and also initializes the directory as a Git repository. You should continue and connect it to your Git repository, and push an initial commit.

The --demo option will fill in some blanks in your configuration file, and is recommended the first time.

Configure Nikola

Nikola settings live in the conf.py file that was created when you initialized your blog.

You can view the demo conf.py online, here.

Most of the settings are self-explanatory, and many of them have defaults. However, we do need to change a few things for our theme and the orgmode plugin.

Configure orgmode

At the bottom of conf.py, add the following:

# Add orgmode to compilers dict
COMPILERS["orgmode"] = [".org"]

# Add org files to posts and pages
POSTS = POSTS + (("posts/*.org", "posts", "post.tmpl"),)
PAGES = PAGES + (("stories/*.org", "stories", "story.tmpl"),)

This will allow you to write posts and pages for your blog in org-mode, with everything that comes with that.

Configure theme

Each theme may have particular settings to configure, but here are the ones for the "hack" theme.

Uncomment GLOBAL_CONTEXT, and set:

THEME = "hack"
# ...snip...
GLOBAL_CONTEXT = {}
GLOBAL_CONTEXT['HACK_VARIANT'] = 'dark'

I also have these additional settings:

DATE_FANCINESS = 2

# For Hack theme
NAVIGATION_LINKS = {
    DEFAULT_LANG: (
	('/index.html', 'Home'),
	('/archive.html', 'Archives'),
	('/categories/index.html', 'Tags'),
	('/stories/about-me', 'About Me'),
	('/rss.xml', 'RSS'),
    ),
}

Configure deployment

You will probably want to configure this after you've successfully built and deployed manually by your usual methods, so that you get the command right, but here's what mine looks like:

DEPLOY_COMMANDS = {
    'default': [
	"rsync -rav --delete output/ root@notroot:/var/www/blog.notroot.online",
    ]
}

I have my host notroot configured in my .ssh/config.

Install and Configure nikola.el

It's a bit outdated, and I can't get M-x nikola-deploy to work, but otherwise we want this.

Simplest thing is to use use-package. Here's my config:

;; Nikola.el config
(use-package nikola
  :config
  (setq nikola-output-root-directory "~/Dev/mine/notroot-blog/")
  (setq nikola-verbose t)
  (setq nikola-webserver-auto t)
  (setq nikola-new-post-extension "org")
  (setq nikola-new-page-extension "org"))

Then from inside your init.el buffer, do M-x load-file RET RET to install and configure nikola.el.

Write a Blog Post in Emacs

Now we can write a blog post, like this one, in Emacs org-mode. Super easy!

Just do M-x nikola-new-post to create a new posts, or M-x nikola-new-page to create a new page, like my "About Us" page.

Emacs will give you an *.org file, but will also create a *.meta file. Most things will be preset, but you will probably want to add tags. Here's the meta file for this blog post:

.. title: How I Made This Site (This Time)
.. slug: how-i-made-this-site-(this-time)
.. date: 2024-04-07 18:29:06
.. tags: nikola,emacs,org-mode,blogging,tutorial

And here's a screenshot of me writing this post! Talk about "meta" heheh:

nil

Preview and Build

You can also preview your work.

Do M-x nikola-webserver-start and navigate to the URL shown in the mini-buffer.

To see changes in the blog post, you will need to stop it with M-x nikola-webserver-stop, and restart it. Nikola does not rebuild on save.

Run M-x nikola-build. You can watch the progress in the *Nikola* buffer.

How Nikola Builds

One of the nice things about Nikola is that it builds using Emacs org-mode export to HTML directly, rather than translating to another markdown format, first. No pandoc is involved. No intermediary *.md files.

The benefit is obvious: the HTML will exported from your org files pretty much how you expect.

The one exception I've found is that inter-org file links like [[file:another-blog-post.org]] will be turned into <img> tags, not <a> tags, which is too bad. That's because the slugs Nikola uses don't match org-mode's own. I'm sure there's an elisp workaround, but I haven't played with it, yet.

Fortunately, this is org-mode! If you need to link from one blog post to another, just do something like:

#+begin_export html
<a href="/posts/publishing-with-nikola-in-emacs/">Publishing with Nikola in Emacs</a>
#+end_export

Deploy Your Blog

The nikola-deploy command is, unfortunately, not working for me. I have forked this old project, and at some point I'll try to fix it, but for now, I just use the shell command in Emacs.

Do M-! nikola deploy to upload your site to your webserver.

Then browse to your new blog. If everything is working, you should be live!

Conclusion

Once you get Nikola and nikola.el working, this is a very easy way to blog, if you're an Emacs person. It's intuitive and highly configurable.

For example, Nikola does it's own syntax highlighting, but I'll be adding something like highlight.js down the road. I can add comments sections, and I've barely touched the possible Nikola add-ons.

If you're an Emacs person, I think this is one of the more flexible, but robust, SSG integrations out there. I, too, love the idea of publishing natively using only Emacs, but one of the great features of Emacs is also its ability to compose cleanly with other commandline tools.

Blog Upgrade

I'm an engineer, and I'm an Emacs nut, so yes: I tinker a lot.

My latest tinkering was to move my Nikola- and Emacs-based blog out of GitHub, when I abandoned that service entirely, and moved all my code to GitLab.

My reasons for moving are pretty straightforward: I think the "AI" hype is bullshit, and I won't have anything to do with it. I certainly don't want Micro$oft training their "AI" LLMs on my code. Fuck our robot overlords. They can meet me in the street and we can fight it out.

GitLab also has "AI" features, but nothing like GitHub. What's more, I can host my own GitLab and eschew their "AI" fuckstickery, entirely. Can't do that with GitHub, so it was an easy calculus to perform.

I did try to use GitLab Pages, which is really part of GitLab CI, which is to say, "Pipelines".

Overkill, yo. Too much configuration-over-convention for my taste. I don't like Python Django, either, for the same reason. If I'm doing web work, gimme Flask any day of the week.

Anyhow, while I was moving my blog, I thought I'd give it a new look. No more white background, and no more left-aligned container div.

Still not much here on this pathetic blog, but maybe now that I can write and easily deploy to my own host, I'll actually blog a little more.

I might even write about something besides Emacs!

Ya never know…

Mastodon and the Fediverse: Will It Finally Happen?

I set up my own Mastodon instance. Took a few hours, including the upgrade to v4.0.2, but overall, it was worth it.

I'm not a regular blogger, and besides, this blog is supposed to be a little more technical. But, I'm also a longtime proponent of federated social network experiments, like diaspora* – none of which have ever quite achieved the network effect to gain the widespread adoption needed to go viral.

Without commenting on what, or who, is driving the migration of users from Twitter to Mastodon, I believe the moment George Takei and Jeri Ryan of Star Trek fame joined Mastodon, it had finally achieved the notoriety needed to flourish. I think it's over. A done deal.

Which means, I'm interested in the Fediverse all over again.

Mastodon, in particular, has the potential to make setting up instances turnkey easy. Whether for personal, group, institutional, or brand localization, if it's push-button easy to make your own instance, even more people will join. If upstream UI/UX adapts to user needs, as they appear they will, then it should be ever-easier.

I don't know if that will happen, and I'm nowhere near plugged-in enough to even speculate.

But you can expect me to blog more often on this topic, if it starts to catch on.

Yes, I am an Emacs Evangelist. Deal with it.

Basically, see the title.

I have good reasons. Small example:

Recently, I worked with a partner's team on one project's API documentation, and with a contractor on completely different project, and its API docs. Different companies, even.

The Partner Team at one company uses Swagger. The Contractor wants to use the Postman API Documentation Tool. Meanwhile, I don't use either.

I use Emacs. I need no other tool for these things.

As I describe elsewhere in this blog, to generate API documentation after making changes in my literate API org file, I type C-c C-e h h. That's it. Dude clicks a button. Other dude clicks a button. I type that mess. Which is harder?

After I type C-c C-e h h, unlike dudes clicking buttons, I have to wait a bit as Emacs makes innumerable actual API requests to get data to fill out the "Response" section in the API docs. I don't get an instantaneous response, because unlike other solutions, this isn't a toy.

It took skill to write. The same skill on display in the API, itself.

I usually watch as Emacs builds my static API documentation, replete with JS, because as soon as I see unusual errors popping up, I know something is wrong. I can hit C-g and switch to the *Messages* buffer to find out how the API responded. What the error was, and maybe how to fix it.

Then I can run again. C-c C-e h h.

I still have not left Emacs.

Swagger:

Compare to Swagger. I spent a day and part of a night writing yaml that does nothing. It does not make any API requests. It does not let me make SQL requests, or use bash or python or R or restclient. It just makes cookie-cutter API documentation with extremely limited "documentation" because you basically have to document in yaml or json.

The real issue with Swagger is that it's a toy. It's buttons with rudimentary documentation, and an ecosystem that encourages code-generation. Sorry, but no. I like writing code. I don't want to spend days learning and setting up a configuration-first system where I don't have to write code.

I did the work to make some Swagger, because it was required. But while I did it, I also wrote an org file that actually calls each endpoint, and shows me the response and response headers, in full. In Emacs. In the file, under version control. As an afterthought, I added a link to the Swagger file as a link when the API documentation exports.

Postman API Documentation Tool:

Recently, a contractor wanted to update the API documentation on the project we're working on together, and he was confused. He immediately concluded that I was manually updating the API documentation, and suggested something that everyone could use, like Postman.

I sent him a link to Orgdown. I'm sorry, but why should I learn Postman – a proprietary commercial product – instead of him learning Orgdown? He doesn't have to install anything. I have to install Postman, get an account, share that account with him… so much STUFF for something I will only use because of him. The other back-end engineer already groks org.

It got me to thinking, though. Why not switch to Postman? He has a point. I'm an Emacs evangelist… definitely a fringe group. I'm also not a snob. VS Code is fantastic. Vim does stuff. I know :qw so… Why not embrace some API documentation framework?

Conclusion:

No. I will continue to use the README.org that magically turns into a beautiful, up-to-date API doc with four key-chords. That makes SQL queries to my dev DB to find out which records to use in queries. That uses free bash tools like jq to compose data for display.

I want to keep my API documentation under version control with the API code. So, if I roll back… bye-bye documented changes. I want my API to be in perfect sync with the documentation. I want it to be programmatic. I want it to actually make an HTTP request with a valid bearer token to a real endpoint, get a response, and include that response in pretty HTML. I want it all.

I don't want a demo, like Swagger. I'm not writing a business plan. I'm writing documentation for something that already exists. I don't want to yaml that describes the structure of example responses and maintain them when they change.

And I don't want to login to an app and click buttons. My RSI is bad enough as it is, and it's all mouse (my left pinky is just fine, thank you). When I want to know what's in an S3 bucket, do I browse to the AWS console? No. I use awscli. It's under my fingers, already. When I want to test my new API endpoint while I'm working on it, do I make a new request in a collection of Postman, which is completely useless anywhere else? No. I create a restclient source block and hit C-c C-c. That simple.

Yes, I know how to use Emacs.

No, I do not know how to use Postman.

Yes, I'm the Software Architect.

Guess which way we're generating API docs?

Writing Literate API Documentation in Emacs Org Mode

On a scale of "NFT" to "Integer", Literate Programming usually rates a little below the bottom on the usefulness scale. Unfair! It's not entirely unearned, but there are some things that "LitProg" (kidding!) is very good for.

With restclient, ob-restclient and Emacs Org Mode, I'll show you how to write beautiful, useful, self-generating API documentation that easily renders to a static website, using a template forked off of Read the Docs.

Where's the "WOW!" you may ask? Using this technique, you can entirely get rid of Postman or whatever clunky proprietary REST API client you're using. The API documentation IS the program.

nil

The only other requisite is an API to talk to. For this tutorial, we'll be using the free, public JSON Placeholder API.

NOTE: Since I wrote this blog post in Org Mode, the included examples of Org are exported as plain-text examples, without syntax-highlighting. Suffice it to say that Org text looks much prettier in Emacs.

TL;DR: Complete Example Org File

Getting Started

First, install and configure restclient and ob-restclient in your Emacs.

Then, create a new file in Emacs, called jsonplaceholder.org. At the top of this file, include the following header information (obviously change the author and email):

#+title: JSON Placeholder API Documentation
#+author: Joseph Edwards VIII
#+email: foobar@example.com

#+startup: indent
#+export_file_name: index.html
#+options: num:nil ^:nil H:5 toc:2

#+setupfile: https://fniessen.github.io/org-html-themes/org/theme-readtheorg.setup

Let's talk about this header a bit, since it's not immediately apparent what's going on.

The top section is self-explanatory. The second section just tells Emacs to display org-mode with indents, specifies the name of the file to export to, and controls the way that section headings and the table of contents will be displayed.

The final section loads the HTML template setupfile to use when exporting to HTML. In practice, I also add a number of #+html_head: items to customize the ReadTheOrg theme CSS.

Initialize

The first section we'll add will serve a functional purpose, and initialize the document. In practice, this section can be quite detailed, allowing you to obtain a bearer token, read values from a database, or otherwise initialize elements that will be used later in the program. For our simple example, we only need one element: the URL to the API.

It may seem odd to parameterize the API URL. Don't we want it shown in our requests? Perhaps. But perhaps, like most software engineers, we have separate development, staging and production environments? We would have to find and replace each URL to change environment. This way, we can just change it in one place.

One small note: we don't want to export this section to HTML. We can tell Emacs this by adding the :noexport: tag to the section header.

In your jsonplaceholder.org file, add:

* Init :noexport:

#+name: api-url
: https://jsonplaceholder.typicode.com

Setting the #+name: api-url means we can reference the scalar value : https://jsonplaceholder.typicode.com from other source blocks in our document. We can take api-url as input.

Introduce

While in practice, we're going to be using jsonplaceholder.org to make API requests, Emacs will also be making API requests when we export to HTML to generate the API documentation.

That reminds us that this is documentation. So write a nice introduction for your readers, as well.

In your jsonplaceholder.org file, add the following (copied from the actual API documentation for JSON Placeholder):

* Introduction

JSONPlaceholder is a free online REST API that you can use whenever you need some fake data. It can be in a README on GitHub, for a demo on CodeSandbox, in code examples on Stack Overflow, ...or simply to test things locally.

Making Requests

Now let's document our first request and response. JSON Placeholder provides six resources, and routes for all HTTP methods. We'll start with the /posts resource.

In your jsonplaceholder.org file, add:

* Posts

The ~/posts~ resource allows us to create, read, update, and delete posts.

#+name: get-posts
#+begin_src restclient :var api=api-url
  GET :api/posts
#+end_src

Notice in the source block header, we are directing Org to use restclient as the language.

We also set the variable api to the value stored in the scalar named api-url. When using Org variables inside a source block, you just use the variable as you normally would in that language. In restclient, we preface variables with a colon, so that's how we use it in the request, GET :api/posts.

Now, make the API call by typing C-c C-c with the cursor inside the source block. The response will be displayed below the request block, in all its gory glory!

And this illustrates the usefulness of literate API documentation. We aren't going to include example requests and example responses that have to be updated whenever changes are made to the API endpoints or responses.

We're only including real requests!

Exporting

We only have the one request, but it's enough to export. Let's try it!

In your jsonplaceholder.org file, type C-c C-e h o to export to index.html in the same directory as your org file, and then open that file in the browser. It should look like this:

nil

Ok, but where's the response? Emacs didn't make the API request and include the response like I promised! Oh no!

That's OK. By default, Emacs only exports the source block. To also export results, edit the header of the source block named get-posts. Add :exports both so that it looks like:

#+begin_src restclient :var api=api-url :exports both

And export, again. Now you should see the response, as well!

nil

No more updating example responses and including embarrassing typos! This is real, live response data.

Appearance

Before we go any further with the "programming" part of "literate programming", let's recall for a moment that we are writing API documentation, and we want it to be clean and readable. Let's spend a little time sprucing up the appearance.

Currently, our document is ugly in three ways:

  1. The anchors to headings are ugly, and read like: index.html#orga1b1b2d
  2. The response is too big! We will have to scroll for pages to get to the next request.
  3. The response headers are dumped out at the bottom of the response. It's not clean JSON.

Ugly Anchors

The ugly anchors issue is easily solved. When Emacs exports to HTML, it generates random anchor tags for headings, but we can easily specify a custom ID.

In your jsonplaceholder.org file, place your cursor at the end of the Introduction heading, and then type C-c C-x p to add a property. Type in CUSTOM_ID for the property name, and introduction for the value.

Now do the same thing for the Posts heading, setting CUSTOM_ID to resource-posts.

It should now look like this:

* Posts
:PROPERTIES:
:CUSTOM_ID: resource-posts
:END:

Enormous Response

Inspecting index.html reveals that the size of the response block is determined by the tag and class pre.src. Some tinkering on my part results in the following snippet:

<style>pre.src{background:#343131;color:white;max-height:500px;overflow-y:auto;}</style>

We can add this to our exported index.html very easily in Org Mode using the #+html_head: header. After the line that starts with #+setupfile:, add:

#+html_head: <style>pre.src{background:#343131;color:white;max-height:500px;overflow-y:auto;} </style>

Also, nobody likes "Light Mode," so I changed to "Dark Mode".

Ugly Response

The ugly response headers we see are coming from the restclient package, and there's no way to suppress them without hacking over restclient itself. That of course is do-able … this is Emacs, after all.

We will instead use a literate solution.

One of the more powerful features of Literate Programming is language-agnosticism. We run a SQL query from Org Mode, and pipe the data to a Python source block where we manipulate it, then pass it on to Bash, then to R, then to Elisp, then to Common Lisp, then back to Python and save it back to the database.

In our case, we're going to leverage shell and the 'jq' command-line JSON processor.

Go ahead and install jq now, and then change your Posts request so it looks like the following:

#+name: get-posts
#+begin_src restclient :var api=api-url :results value
  GET :api/posts
#+end_src

#+begin_src shell :var response=get-posts :results value raw :wrap src js :exports results
  echo $response | jq
#+end_src

And now place your cursor in the bottom (shell) source block, and type C-c C-c.

The response block calls the get-posts request block, and then pipes $response into jq.

Wow! No more response headers! Just nice, clean JSON.

Black Magic Explained

"But what is this black magic?!" you may ask. Let's pop the hood.

The first big change was to the request. No longer are we saying, :exports both. Now we are instead saying, :results value. As mentioned, the default for :exports is only the source block. By deleting :exports both, we're going back to that default. This source block will not be evaluated, nor will the results be exported.

Instead, we now tell the request, :results value. What does that mean? It's complicated, but basically it just means that Org gets the value from the evaluated code, itself, rather than using an external process.

The second, more obvious change is that we've added a second source block, just for results. Several important things are happening in the block header:

  1. We call shell this time. That will be whatever shell (bash, cmd.exe, fish, etc.) you are using.
  2. We set a new variable :var response=get-posts. Now this source block will call the request block named get-posts and put the results in the variable named response.
  3. We set :results value raw because we don't want Org to wrap the results in shell type.
  4. We set :wrap src js because we DO want Org to wrap the results in js type.
  5. We set :exports results because we don't want to see the source code, only the results.

Finally, inside the shell block, we pipe the $results variable into jq, which strips out the response header comment lines and outputs nicely formatted, prettified JSON for our results block.

Putting It All Together

Let's see how our tweaks to appearance worked out! Export your jsonplaceholder.org file again with C-c C-e h o and you should now see something like:

nil

Finishing Touches

Looks much better, but there's a few more tweaks to make. Since it's just applying the same principles we already discussed, let's fast-forward to the end.

Change your jsonplaceholder.org file so it looks like this:

#+title: JSON Placeholder API Documentation
#+author: Joseph Edwards VIII
#+email: foobar@example.com

#+startup: indent
#+export_file_name: index.html
#+options: num:nil ^:nil H:5 toc:2

#+setupfile: https://fniessen.github.io/org-html-themes/org/theme-readtheorg.setup
#+html_head: <style>pre.src{background:#343131;color:white;max-height:500px;overflow-y:auto;} </style>
#+html_head: <style>p{margin-bottom:1em;}</style>
#+html_head: <style>h2{padding-top:1em;margin-top:2em;border-top:darkgray 2px solid;}</style>
#+html_head: <style>h3{padding-top:1em;margin-top:2em;border-top:lightblue 1px dashed;}</style>
#+html_head: <style>h4{padding-top:1em;margin-bottom:1em;}</style>
#+html_head: <style>h5{color:black;font-size:1em;padding-top:1em;margin-bottom:1em;} </style>
#+html_head: <style>div.response>h5,div.request>h5{padding-top:0;margin-bottom:0.5em;color:darkgray;font-size:0.8em;}</style>
#+html_head: <style>h6{margin-bottom:1em;}</style>

* Init :noexport:

#+name: api-url
: https://jsonplaceholder.typicode.com

* Introduction
:PROPERTIES:
:CUSTOM_ID: introduction
:END:

JSONPlaceholder is a free online REST API that you can use whenever you need some fake data. It can be in a README on GitHub, for a demo on CodeSandbox, in code examples on Stack Overflow, ...or simply to test things locally.

* Posts
:PROPERTIES:
:CUSTOM_ID: resource-posts
:END:

The ~/posts~ resource allows us to create, read, update, and delete posts.

** ~GET /posts~
:PROPERTIES:
:CUSTOM_ID: method-get-posts
:END:

Obtain all posts.

**** Request
:PROPERTIES:
:HTML_CONTAINER_CLASS: request
:END:

#+name: get-posts
#+begin_src restclient :var api=api-url :results value
  GET :api/posts
#+end_src

**** Response
:PROPERTIES:
:HTML_CONTAINER_CLASS: response
:END:

#+begin_src shell :var response=get-posts :results value raw :wrap src js :exports results
  echo $response | jq
#+end_src

Now our index.html should look like this:

nil

Discussion

Briefly let's highlight a couple items in the above changes.

First, note the use of a new property, :HTML_CONTAINER_CLASS: request and :HTML_CONTAINER_CLASS: response. Upon export, this property attaches the respective CSS class of .request or .response to the div element containing the heading. In this way, we can style div.request>h5 and div.response>h5 to make clear what each of these blocks is for.

Also, note that we have moved our request and response sections inside a new subheading of Posts, called GET /posts. Now, when we click on "Posts" in the sidebar menu, we see "GET /posts" as a submenu item. This is controlled at by the Org header directive #+options: toc:2 included. If we set it to toc:1 we would not see the submenu. If we set it to toc:3 we would see "Request" and "Response" in the submenu below "GET /posts". Try it and see!

Finish the Job

Documenting the rest of the API now proceeds according to a set pattern. Indeed, a yasnippet could be constructed to insert a new method section, and speed the process along.

However, that doesn't reflect the utility of the Literate Programming approach to API documentation. Normally, I write this documentation as I am building new API endpoints, in order to test and perfect the endpoint. I use this method instead of Postman, and when I am done working on the API, it is already documented and under version control with the source code.

For example, I would have written what we have so far at the same time I was writing GET :api/posts, and I would have used that file extensively, making note of any parameters required.

When I pushed code, anyone on my team (who uses Emacs) could open the README.org and test the API for themselves.

As a last step before I push code, I can generate the index.html and pop it into a public static directory. Now when you browse to the base URL of my API, instead of getting an error message, you get API documentation.

Let's wrap up this post by documenting the rest of the /posts resource methods. This will also serve to illustrate how to use restclient to perform POST, PUT and DELETE HTTP methods.

Adding a POST Method

Let's add a POST /posts header under GET /posts. You can copy and paste, and then change the following:

  1. Change :CUSTOM_ID: from method-get-posts to method-post-posts
  2. Change the "Request" #+name: from get-posts to post-posts
  3. Change the "Response" :var response from get-posts to post-posts

Now, add the variable :var user-id=1 to the post-posts request source block header. With requests, we also need to specify the content type and JSON payload to deliver.

Notice that we can use Org variables inside the JSON payload. WOW!

The final POST request should look like:

#+name: post-posts
#+begin_src restclient :var api=api-url :var user-id=1 :results value
  POST :api/posts
  Content-Type: application/json

  {
    "title": "foo",
    "body": "bar",
    "userId": :user-id
  }
#+end_src

Now, when you put the cursor in the "Response" block and type C-c C-c you should get back the new post data you created in JSON Placeholder. It should look something like:

{
  "title": "foo",
  "body": "bar",
  "userId": 1,
  "id": 101
}

Adding a PUT Method

As you can imagine, the process proceeds similarly. Copy and paste POST /posts to PUT /posts/:id, and change the custom ID, request name, and response variable to put-posts.

Now our request should look similar to a POST request, except now we must specify the post's id in the URL, and the JSON we use will update an existing post, rather than creating a new one.

Our final PUT request should look like:

#+name: put-posts
#+begin_src restclient :var api=api-url :var id=1 :var user-id=1 :results value
  PUT :api/posts/:id
  Content-Type: application/json

  {
    "title": "foo",
    "body": "bar",
    "userId": :user-id
  }
#+end_src

Adding a DELETE Method

Surprise, surprise! Same idea as before. Copy, paste, change, run, profit!

#+name: delete-posts
#+begin_src restclient :var api=api-url :var id=1 :results value
  DELETE :api/posts/:id
#+end_src

Conclusion

Our final API documentation isn't very detailed (we only documented the /posts resource) but the rest is just a repetition of what we've already discussed. Still, it's quite nice, and can easily be made nicer:

nil

Also, as discussed, it would be easy enough to write a yasnippet to automate create new method sections, then tab from field to field filling it out.

Also as discussed, that's not really the most useful approach to writing Literate API documentation. More useful is to write it as you go, using the document instead of Postman. Then not only is your documentation never wrong or out of sync with the API, but you don't have to go back and "waste time" documenting something you've already completed!

Next Steps

More advanced Literate Programming techniques may also prove useful when writing Literate API Documentation.

I have one such document I wrote for the Wurkzen API which allows you to acquire and cache a bearer token used in later requests.

It then creates a number of objects using the API, and then uses them to construct an entire dummy client, customers, locations, and perform all the API actions against dummy data that was created by the document, and then deleted by the document.

And if there are errors in my API, then the API documentation displays the errors! It also acts as an integration test, as detailed as you want to make it.

AND every request made by Emacs as it exports to HTML is displayed in Emacs minibuffer and logged in Emacs *Messages* buffer, so you can find errors with an incremental search instead of reading the index.html.

Literate Programming: beautiful, elegant, powerful.

And useful!

P.S.

I ended up writing a yasnippet for this anyway.

Type in lit-api and C-<tab> and then tab from field to field.

Publishing with Nikola in Emacs

Publishing Emacs Org Mode files to GitHub Pages with Nikola is fairly straight-forward. But if you want, as I did, to write and publish from within Emacs using org-mode, then there's more setup involved. It's still not terribly difficult, however. I did this all today.

The final blog is going to be very vanilla, so I've included some additional resources to play with, as much for my own reference as for you, the reader's.

UPDATES!

<2022-01-29 Sat> <2024-04-07 Sun>

The really nice tutorial linked to above and below is 404. Since this tutorial picks up where that one left off, I've added a few other links. Some of these are old. Some don't talk about Org Mode. But the objective is this:

Before continuing this tutorial, get Nikola to publish Org files from the command-line to your GitHub Pages. Here's some resources that describe how to do that:

I will try to come back and write my own command-line tutorial later as a prequel to this post.

Get Nikola Working

Before we start, save yourself a headache and don't install Nikola in a Python virtual environment. Or if you're using pyenv, install it in the global environment. This works fine in the terminal, but we're going to be writing some extra elisp for the nikola.el package. I have no doubt there's a way to get this package working with virtual environments, but as of this writing, I haven't figured it out.

Next, follow the instructions in this excellent tutorial to get all the pieces working together, and to learn the command-line way of doing things as a fallback.

The end result will be your first blog post on your GitHub Page. Now that you know it works, let's move on to setting up Emacs so you never have to leave it to write and publish.

Install and Configure nikola.el

We're going to use the "simple wrapper" nikola.el package as a base. Follow these instructions to install and configure it.

We want to default to Org files, instead of HTML, so here's the use-package config I have in my init.el. Note that I've turned on nikola-verbose and nikola-webserver-auto as well as setting the default extension to "org":

;; Nikola.el config
(use-package nikola
  :config
  (setq nikola-output-root-directory "~/Dev/mine/blog.notroot.online/")
  (setq nikola-verbose t)
  (setq nikola-webserver-auto t)
  (setq nikola-new-post-extension "org")
  (setq nikola-new-page-extension "org"))

Add Wrapper for github_deploy

At this point, we could just start writing by using the nikola-new-post command. It will open an Org file and you can start typing, as I am right now.

The problem comes when we run nikola-deploy. That command basically runs nikola deploy in a shell, but that's not the command we want to run. We want to run nikola github_deploy, as we did on the command-line.

So you'll also need to add the following nikola-github-deploy function to your init.el, which I simply whittled down from the nikola-deploy:

;; Custom nikola-github-deploy function
(defun nikola-github-deploy ()
  "Deploys the site to GitHub using github_deploy subcommand."
  (interactive)
  (message "Deploying the site to GitHub pages...")
  (async-start
   `(lambda ()
      ,(async-inject-variables "\\(nikola-\\)")
      (setq output nil)
      (let ((default-directory nikola-output-root-directory))
	(run-hook-with-args 'nikola-deploy-before-hook "")
	(if (not (eq nikola-deploy-before-hook-script nil))
	    (setq output (shell-command-to-string
			  nikola-deploy-before-hook-script)))
	(setq output (shell-command-to-string (concat nikola-command " github_deploy")))
	(if (not (eq nikola-deploy-after-hook-script nil))
	    (setq output (shell-command-to-string
			  nikola-deploy-after-hook-script)))
	(run-hook-with-args 'nikola-deploy-before-hook ""))
      output)
   (lambda (result)
     (if (cl-search "This command needs to run inside an existing Nikola site."
		    result)
	 (if (eq nikola-verbose t)
	     (message "Something went wrong. You may want to set nikola-verbo\
se to t and retry it.")
	   (message "Something went wrong. You may want to check the *Nikola*\
buffer."))
       (message "Site deployed correctly."))
     (if (eq nikola-verbose t)
	 (save-window-excursion
	   (switch-to-buffer "*Nikola*")
	   (let ((inhibit-read-only t))
	     (insert result)))))))

Write and Publish from Emacs

Now you can evaluate the init.el buffer, or restart Emacs, and do nikola-new-post. Emacs will ask for the title, and create the post files, and open a buffer to write a new post.

You'll immediately notice that, unlike the command-line experience you had earlier, the meta is not included at the top of the new buffer that opens. If your new post is named publishing-with-nikola-in-emacs.org, then the meta will be in the same directory, and named publishing-with-nikola-in-emacs.meta. You will have to edit it separately.

.. title: Publishing with Nikola in Emacs
.. slug: publishing-with-nikola-in-emacs
.. date: 2020-11-12 17:25:34
.. tags: emacs,nikola,blogging

When you're done writing your amazing blog post, just save it.

Now try previewing your new post by running nikola-webserver-start. Notice that that this is a live preview, and if you make changes and save again, you will see them when you refresh your browser.

Next, run nikola-build to make sure everything is rebuilt and updated.

When you're happy with the final result, then just publish it with nikola-github-deploy.

Additional Resources

  • Syntax Highlighting: If you included source blocks in your Org file, you probably noticed that syntax highlighting isn't supported. I'm going to look at org2nikola package to add highlight.js support at some point.
  • Themes and Templates: Since I'm almost as new at this as you, the reader, are, I've got jack. I'm going to look into Nikola theme creation at some point in the future, and if suddenly this blog looks better, it's because I learned something. I'll probably blog about it!

EXWM on Raspberry Pi OS Lite

  1. Install Raspberry Pi OS Lite (buster)
  2. Login as pi/raspberry
  3. Enable sources in /etc/apt/sources.list, then sudo apt update && apt upgrade
  4. Install basic but required build tools:

    sudo apt install build-essential

  5. Install xorg and WebKitGTK+:

    sudo apt install xorg xorg-dev libwebkit2gtk-4.0-dev

  6. Prepare for latest Emacs install by installing dependencies of latest previous version in the repo:

    sudo apt build-dep emacs

  7. Get the latest Emacs, and configure it thusly:

    ./configure --with-imagemagick --with-xwidgets

  8. Build and install Emacs:

    make && sudo make install

  9. Get my literate README:

    git clone https://github.com/joseph8th/literatemacs.git

    • Open README.org in Emacs, then follow instructions to get a basic init.el installed in .emacs.d/
    • In addition, copy the elisp/ directory into .emacs.d/
    • Run Emacs to install packages and debug init as needed:

      emacs --debug-init

  10. Open README.org again, and enable the EXWM entanglement. Then save, and it will tangle EXWM files.

        cp xinitrc.exwm ~/.xinitrc
        ln -s exwm-init.el ~/.emacs.d/
    
  11. Reboot and do startx after login. Debug init as needed.

Blog is a Weird Word

Hello, World.

I've had many blogs off and on over the years, but I was never satisfied with the blogging platforms I chose, which, admittedly, is not a very large set. OK, it was two: WordPress and Octopress. Octopress at least satisfied my penchant for working in the terminal, and let me use my favorite editor (Emacs, obviously), but I was broke at the time and self-hosting. Eventually, I just let it die off naturally.

Now I'm not broke, but I'm still cheap. With GitHub Pages, and Nikola, I can write posts in Emacs Org Mode and publish for free and with ease. Let's see how long it lasts.