Writing Literate API Documentation in Emacs Org Mode
On a scale of "NFT" to "Integer", Literate Programming usually rates a little below the bottom on the usefulness scale. Unfair! It's not entirely unearned, but there are some things that "LitProg" (kidding!) is very good for.
With restclient, ob-restclient and Emacs Org Mode, I'll show you how to write beautiful, useful, self-generating API documentation that easily renders to a static website, using a template forked off of Read the Docs.
Where's the "WOW!" you may ask? Using this technique, you can entirely get rid of Postman or whatever clunky proprietary REST API client you're using. The API documentation IS the program.
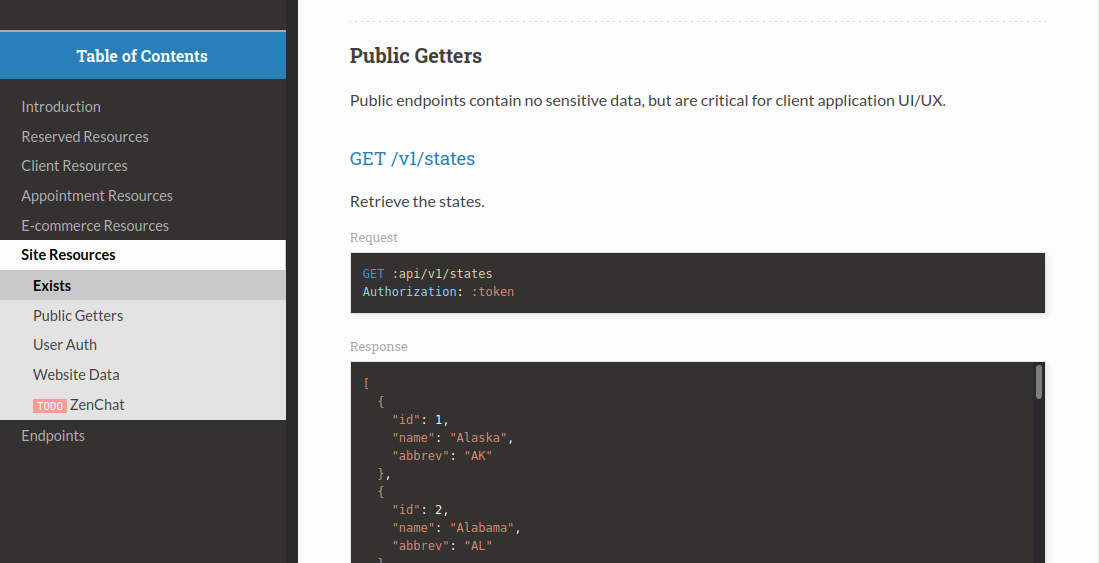
The only other requisite is an API to talk to. For this tutorial, we'll be using the free, public JSON Placeholder API.
NOTE: Since I wrote this blog post in Org Mode, the included examples of Org are exported as plain-text examples, without syntax-highlighting. Suffice it to say that Org text looks much prettier in Emacs.
TL;DR: Complete Example Org File
Getting Started
First, install and configure restclient and ob-restclient in your Emacs.
Then, create a new file in Emacs, called jsonplaceholder.org. At the top of this file, include the following header information (obviously change the author and email):
#+title: JSON Placeholder API Documentation
#+author: Joseph Edwards VIII
#+email: foobar@example.com

#+startup: indent
#+export_file_name: index.html
#+options: num:nil ^:nil H:5 toc:2

#+setupfile: https://fniessen.github.io/org-html-themes/org/theme-readtheorg.setup
Let's talk about this header a bit, since it's not immediately apparent what's going on.
The top section is self-explanatory. The second section just tells Emacs to display org-mode with indents, specifies the name of the file to export to, and controls the way that section headings and the table of contents will be displayed.
The final section loads the HTML template setupfile to use when exporting to HTML. In practice, I also add a number of #+html_head: items to customize the ReadTheOrg theme CSS.
Initialize
The first section we'll add will serve a functional purpose, and initialize the document. In practice, this section can be quite detailed, allowing you to obtain a bearer token, read values from a database, or otherwise initialize elements that will be used later in the program. For our simple example, we only need one element: the URL to the API.
It may seem odd to parameterize the API URL. Don't we want it shown in our requests? Perhaps. But perhaps, like most software engineers, we have separate development, staging and production environments? We would have to find and replace each URL to change environment. This way, we can just change it in one place.
One small note: we don't want to export this section to HTML. We can tell Emacs this by adding the :noexport: tag to the section header.
In your jsonplaceholder.org file, add:
* Init :noexport:

#+name: api-url
: https://jsonplaceholder.typicode.com
Setting the #+name: api-url means we can reference the scalar value : https://jsonplaceholder.typicode.com from other source blocks in our document. We can take api-url as input.
Introduce
While in practice, we're going to be using jsonplaceholder.org to make API requests, Emacs will also be making API requests when we export to HTML to generate the API documentation.
That reminds us that this is documentation. So write a nice introduction for your readers, as well.
In your jsonplaceholder.org file, add the following (copied from the actual API documentation for JSON Placeholder):
* Introduction

JSONPlaceholder is a free online REST API that you can use whenever you need some fake data. It can be in a README on GitHub, for a demo on CodeSandbox, in code examples on Stack Overflow, ...or simply to test things locally.
Making Requests
Now let's document our first request and response. JSON Placeholder provides six resources, and routes for all HTTP methods. We'll start with the /posts resource.
In your jsonplaceholder.org file, add:
* Posts

The ~/posts~ resource allows us to create, read, update, and delete posts.

#+name: get-posts
#+begin_src restclient :var api=api-url
  GET :api/posts
#+end_src
Notice in the source block header, we are directing Org to use restclient as the language.
We also set the variable api to the value stored in the scalar named api-url. When using Org variables inside a source block, you just use the variable as you normally would in that language. In restclient, we preface variables with a colon, so that's how we use it in the request, GET :api/posts.
Now, make the API call by typing C-c C-c with the cursor inside the source block. The response will be displayed below the request block, in all its gory glory!
And this illustrates the usefulness of literate API documentation. We aren't going to include example requests and example responses that have to be updated whenever changes are made to the API endpoints or responses.
We're only including real requests!
Exporting
We only have the one request, but it's enough to export. Let's try it!
In your jsonplaceholder.org file, type C-c C-e h o to export to index.html in the same directory as your org file, and then open that file in the browser. It should look like this:
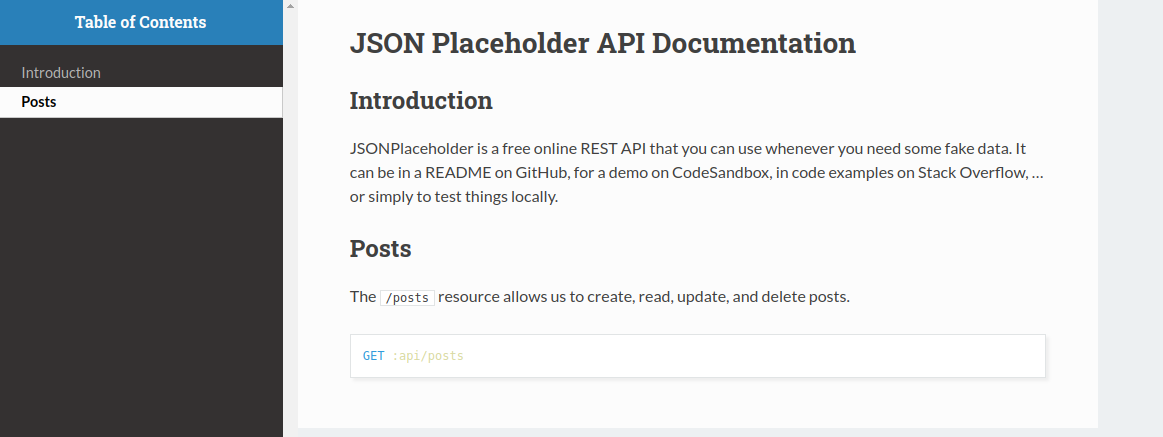
Ok, but where's the response? Emacs didn't make the API request and include the response like I promised! Oh no!
That's OK. By default, Emacs only exports the source block. To also export results, edit the header of the source block named get-posts. Add :exports both so that it looks like:
#+begin_src restclient :var api=api-url :exports both
And export, again. Now you should see the response, as well!
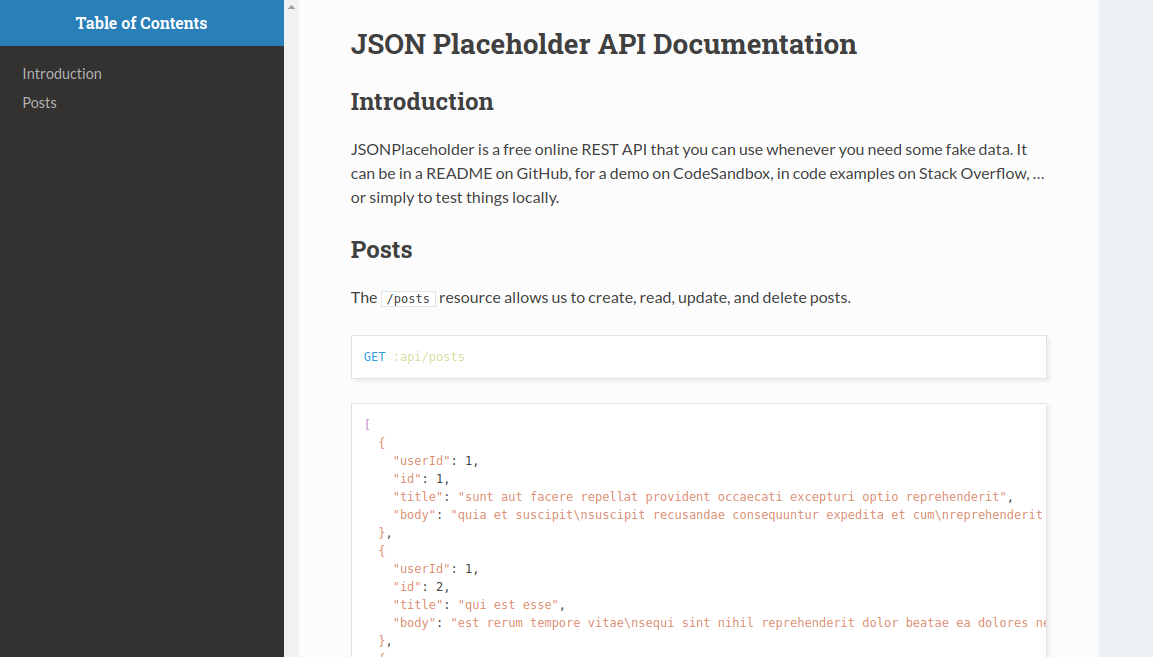
No more updating example responses and including embarrassing typos! This is real, live response data.
Appearance
Before we go any further with the "programming" part of "literate programming", let's recall for a moment that we are writing API documentation, and we want it to be clean and readable. Let's spend a little time sprucing up the appearance.
Currently, our document is ugly in three ways:
- The anchors to headings are ugly, and read like:
index.html#orga1b1b2d - The response is too big! We will have to scroll for pages to get to the next request.
- The response headers are dumped out at the bottom of the response. It's not clean JSON.
Ugly Anchors
The ugly anchors issue is easily solved. When Emacs exports to HTML, it generates random anchor tags for headings, but we can easily specify a custom ID.
In your jsonplaceholder.org file, place your cursor at the end of the Introduction heading, and then type C-c C-x p to add a property. Type in CUSTOM_ID for the property name, and introduction for the value.
Now do the same thing for the Posts heading, setting CUSTOM_ID to resource-posts.
It should now look like this:
* Posts
:PROPERTIES:
:CUSTOM_ID: resource-posts
:END:
Enormous Response
Inspecting index.html reveals that the size of the response block is determined by the tag and class pre.src. Some tinkering on my part results in the following snippet:
<style>pre.src{background:#343131;color:white;max-height:500px;overflow-y:auto;}</style>
We can add this to our exported index.html very easily in Org Mode using the #+html_head: header. After the line that starts with #+setupfile:, add:
#+html_head: <style>pre.src{background:#343131;color:white;max-height:500px;overflow-y:auto;} </style>
Also, nobody likes "Light Mode," so I changed to "Dark Mode".
Ugly Response
The ugly response headers we see are coming from the restclient package, and there's no way to suppress them without hacking over restclient itself. That of course is do-able … this is Emacs, after all.
We will instead use a literate solution.
One of the more powerful features of Literate Programming is language-agnosticism. We run a SQL query from Org Mode, and pipe the data to a Python source block where we manipulate it, then pass it on to Bash, then to R, then to Elisp, then to Common Lisp, then back to Python and save it back to the database.
In our case, we're going to leverage shell and the 'jq' command-line JSON processor.
Go ahead and install jq now, and then change your Posts request so it looks like the following:
#+name: get-posts
#+begin_src restclient :var api=api-url :results value
  GET :api/posts
#+end_src

#+begin_src shell :var response=get-posts :results value raw :wrap src js :exports results
  echo $response | jq
#+end_src
And now place your cursor in the bottom (shell) source block, and type C-c C-c.
The response block calls the get-posts request block, and then pipes $response into jq.
Wow! No more response headers! Just nice, clean JSON.
Black Magic Explained
"But what is this black magic?!" you may ask. Let's pop the hood.
The first big change was to the request. No longer are we saying, :exports both. Now we are instead saying, :results value. As mentioned, the default for :exports is only the source block. By deleting :exports both, we're going back to that default. This source block will not be evaluated, nor will the results be exported.
Instead, we now tell the request, :results value. What does that mean? It's complicated, but basically it just means that Org gets the value from the evaluated code, itself, rather than using an external process.
The second, more obvious change is that we've added a second source block, just for results. Several important things are happening in the block header:
- We call
shellthis time. That will be whatever shell (bash, cmd.exe, fish, etc.) you are using. - We set a new variable
:var response=get-posts. Now this source block will call the request block namedget-postsand put the results in the variable namedresponse. - We set
:results value rawbecause we don't want Org to wrap the results inshelltype. - We set
:wrap src jsbecause we DO want Org to wrap the results injstype. - We set
:exports resultsbecause we don't want to see the source code, only the results.
Finally, inside the shell block, we pipe the $results variable into jq, which strips out the response header comment lines and outputs nicely formatted, prettified JSON for our results block.
Putting It All Together
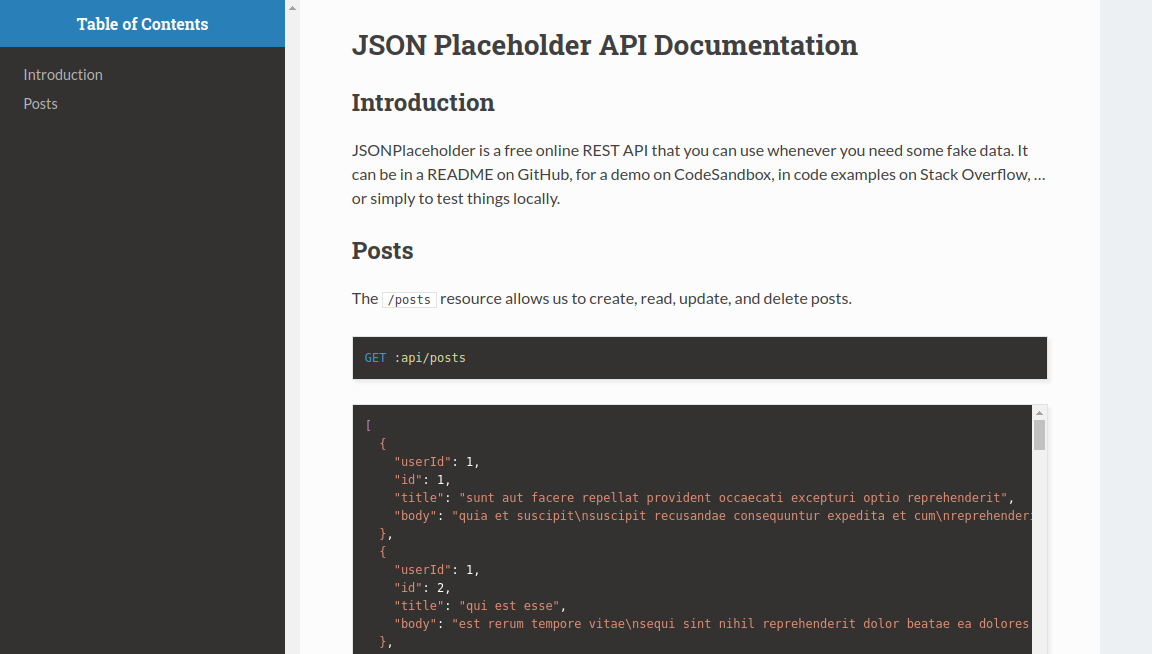
Let's see how our tweaks to appearance worked out! Export your jsonplaceholder.org file again with C-c C-e h o and you should now see something like:
Finishing Touches
Looks much better, but there's a few more tweaks to make. Since it's just applying the same principles we already discussed, let's fast-forward to the end.
Change your jsonplaceholder.org file so it looks like this:
#+title: JSON Placeholder API Documentation
#+author: Joseph Edwards VIII
#+email: foobar@example.com

#+startup: indent
#+export_file_name: index.html
#+options: num:nil ^:nil H:5 toc:2

#+setupfile: https://fniessen.github.io/org-html-themes/org/theme-readtheorg.setup
#+html_head: <style>pre.src{background:#343131;color:white;max-height:500px;overflow-y:auto;} </style>
#+html_head: <style>p{margin-bottom:1em;}</style>
#+html_head: <style>h2{padding-top:1em;margin-top:2em;border-top:darkgray 2px solid;}</style>
#+html_head: <style>h3{padding-top:1em;margin-top:2em;border-top:lightblue 1px dashed;}</style>
#+html_head: <style>h4{padding-top:1em;margin-bottom:1em;}</style>
#+html_head: <style>h5{color:black;font-size:1em;padding-top:1em;margin-bottom:1em;} </style>
#+html_head: <style>div.response>h5,div.request>h5{padding-top:0;margin-bottom:0.5em;color:darkgray;font-size:0.8em;}</style>
#+html_head: <style>h6{margin-bottom:1em;}</style>

* Init :noexport:

#+name: api-url
: https://jsonplaceholder.typicode.com

* Introduction
:PROPERTIES:
:CUSTOM_ID: introduction
:END:

JSONPlaceholder is a free online REST API that you can use whenever you need some fake data. It can be in a README on GitHub, for a demo on CodeSandbox, in code examples on Stack Overflow, ...or simply to test things locally.

* Posts
:PROPERTIES:
:CUSTOM_ID: resource-posts
:END:

The ~/posts~ resource allows us to create, read, update, and delete posts.

** ~GET /posts~
:PROPERTIES:
:CUSTOM_ID: method-get-posts
:END:

Obtain all posts.

**** Request
:PROPERTIES:
:HTML_CONTAINER_CLASS: request
:END:

#+name: get-posts
#+begin_src restclient :var api=api-url :results value
  GET :api/posts
#+end_src

**** Response
:PROPERTIES:
:HTML_CONTAINER_CLASS: response
:END:

#+begin_src shell :var response=get-posts :results value raw :wrap src js :exports results
  echo $response | jq
#+end_src
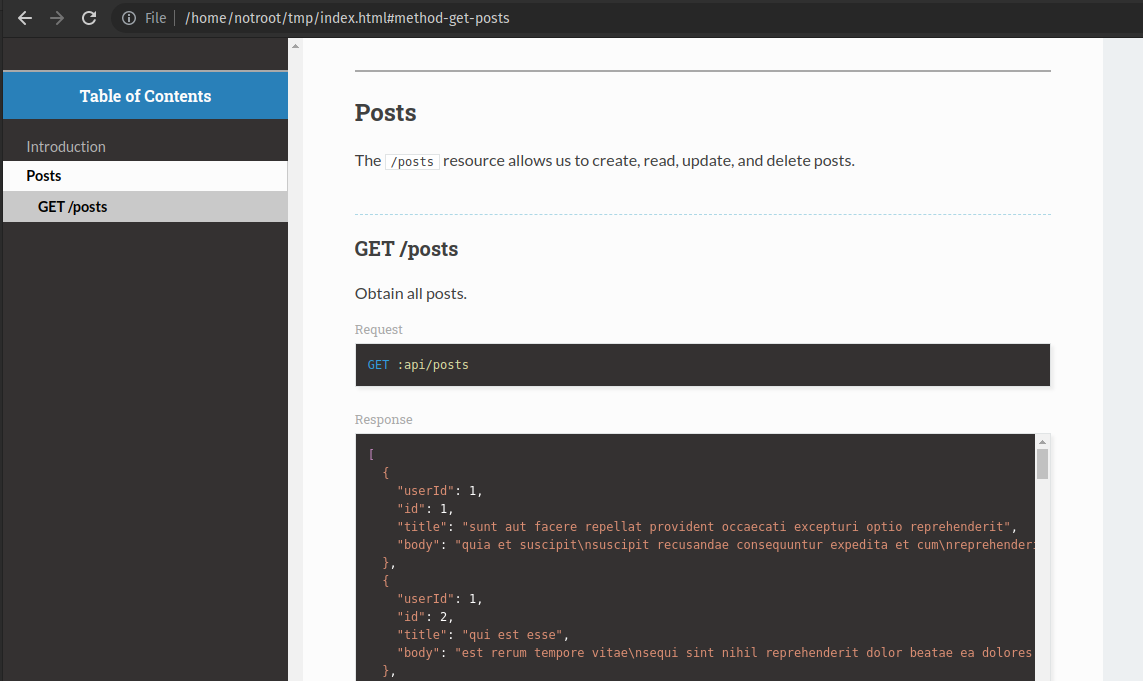
Now our index.html should look like this:
Discussion
Briefly let's highlight a couple items in the above changes.
First, note the use of a new property, :HTML_CONTAINER_CLASS: request and :HTML_CONTAINER_CLASS: response. Upon export, this property attaches the respective CSS class of .request or .response to the div element containing the heading. In this way, we can style div.request>h5 and div.response>h5 to make clear what each of these blocks is for.
Also, note that we have moved our request and response sections inside a new subheading of Posts, called GET /posts. Now, when we click on "Posts" in the sidebar menu, we see "GET /posts" as a submenu item. This is controlled at by the Org header directive #+options: toc:2 included. If we set it to toc:1 we would not see the submenu. If we set it to toc:3 we would see "Request" and "Response" in the submenu below "GET /posts". Try it and see!
Finish the Job
Documenting the rest of the API now proceeds according to a set pattern. Indeed, a yasnippet could be constructed to insert a new method section, and speed the process along.
However, that doesn't reflect the utility of the Literate Programming approach to API documentation. Normally, I write this documentation as I am building new API endpoints, in order to test and perfect the endpoint. I use this method instead of Postman, and when I am done working on the API, it is already documented and under version control with the source code.
For example, I would have written what we have so far at the same time I was writing GET :api/posts, and I would have used that file extensively, making note of any parameters required.
When I pushed code, anyone on my team (who uses Emacs) could open the README.org and test the API for themselves.
As a last step before I push code, I can generate the index.html and pop it into a public static directory. Now when you browse to the base URL of my API, instead of getting an error message, you get API documentation.
Let's wrap up this post by documenting the rest of the /posts resource methods. This will also serve to illustrate how to use restclient to perform POST, PUT and DELETE HTTP methods.
Adding a POST Method
Let's add a POST /posts header under GET /posts. You can copy and paste, and then change the following:
- Change
:CUSTOM_ID:frommethod-get-poststomethod-post-posts - Change the "Request"
#+name:fromget-poststopost-posts - Change the "Response"
:var responsefromget-poststopost-posts
Now, add the variable :var user-id=1 to the post-posts request source block header. With requests, we also need to specify the content type and JSON payload to deliver.
Notice that we can use Org variables inside the JSON payload. WOW!
The final POST request should look like:
#+name: post-posts
#+begin_src restclient :var api=api-url :var user-id=1 :results value
  POST :api/posts
  Content-Type: application/json

  {
    "title": "foo",
    "body": "bar",
    "userId": :user-id
  }
#+end_src
Now, when you put the cursor in the "Response" block and type C-c C-c you should get back the new post data you created in JSON Placeholder. It should look something like:
{
  "title": "foo",
  "body": "bar",
  "userId": 1,
  "id": 101
}
Adding a PUT Method
As you can imagine, the process proceeds similarly. Copy and paste POST /posts to PUT /posts/:id, and change the custom ID, request name, and response variable to put-posts.
Now our request should look similar to a POST request, except now we must specify the post's id in the URL, and the JSON we use will update an existing post, rather than creating a new one.
Our final PUT request should look like:
#+name: put-posts
#+begin_src restclient :var api=api-url :var id=1 :var user-id=1 :results value
  PUT :api/posts/:id
  Content-Type: application/json

  {
    "title": "foo",
    "body": "bar",
    "userId": :user-id
  }
#+end_src
Adding a DELETE Method
Surprise, surprise! Same idea as before. Copy, paste, change, run, profit!
#+name: delete-posts
#+begin_src restclient :var api=api-url :var id=1 :results value
  DELETE :api/posts/:id
#+end_src
Conclusion
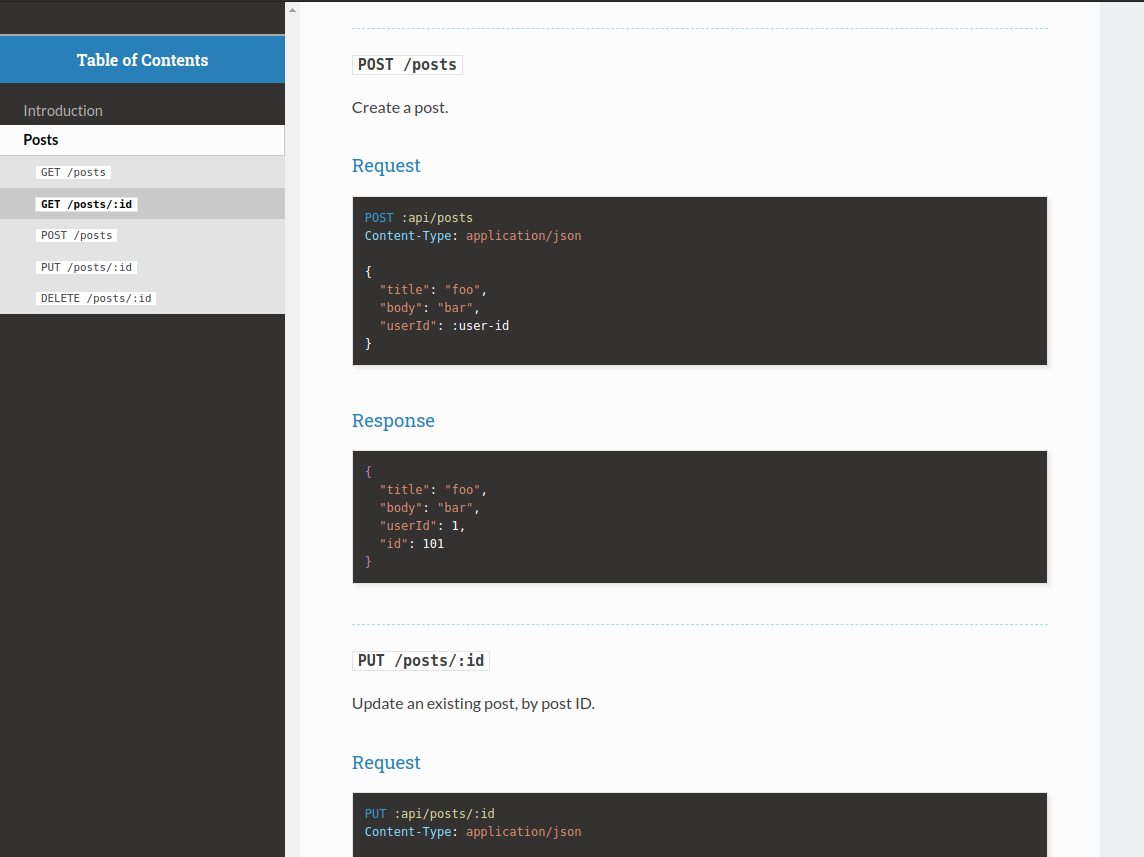
Our final API documentation isn't very detailed (we only documented the /posts resource) but the rest is just a repetition of what we've already discussed. Still, it's quite nice, and can easily be made nicer:
Also, as discussed, it would be easy enough to write a yasnippet to automate create new method sections, then tab from field to field filling it out.
Also as discussed, that's not really the most useful approach to writing Literate API documentation. More useful is to write it as you go, using the document instead of Postman. Then not only is your documentation never wrong or out of sync with the API, but you don't have to go back and "waste time" documenting something you've already completed!
Next Steps
More advanced Literate Programming techniques may also prove useful when writing Literate API Documentation.
I have one such document I wrote for the Wurkzen API which allows you to acquire and cache a bearer token used in later requests.
It then creates a number of objects using the API, and then uses them to construct an entire dummy client, customers, locations, and perform all the API actions against dummy data that was created by the document, and then deleted by the document.
And if there are errors in my API, then the API documentation displays the errors! It also acts as an integration test, as detailed as you want to make it.
AND every request made by Emacs as it exports to HTML is displayed in Emacs minibuffer and logged in Emacs *Messages* buffer, so you can find errors with an incremental search instead of reading the index.html.
Literate Programming: beautiful, elegant, powerful.
And useful!
P.S.
I ended up writing a yasnippet for this anyway.
Type in lit-api and C-<tab> and then tab from field to field.

Comments